Procedures are step-by-step instructions that explain how to perform specific tasks. A Procedure explains how to perform the task, who performs the action, what action is taken, and what is the task sequence. A Procedure must have a definitive start and end point.
1. Use the correct tools
Never, Never, Never use Excel or PowerPoint or similar types of software to write a Procedure. You will lose all the needed tools and capabilities that are offered with document processing software, such as Styles, Table of Contents, Lists, and Document Maps.
PowerPoint is a presentation tool that uses a slide format. Excel is a spreadsheet tool that uses a cell format. Word is a document processing tool that uses a page format. Each tool has different purposes and functions. Word provides the capabilities that are not available with PowerPoint or Excel, as document processing is not its purpose.
Your company may require you to use other document processing tools. There are many tools that are acceptable, but they must have the functionality to create and maintain documents.
2. Linear and nonlinear Procedures
A Process flow will give an indication as to whether a Procedure is linear or nonlinear. The number of decisions, departments, end-of-process points, controls, and so forth will be indicative of a linear or nonlinear Process.
Linear Procedures
Linear Procedures are straight, with few decision points or iterations. An example would be customer setup or vendor setup. While the Procedure may be lengthy, requiring multiple transactions, the Procedure is still linear.
Nonlinear Procedures
Nonlinear Procedures are those that have numerous control points, rework/error processing, approvals, and iterations. The Procedure has different paths that can be performed, based on a result or a decision. Documenting this type of Procedure is challenging, in that it may be confusing to the user. Nonlinear Procedures are usually complex and may require a high-level Procedure flow, as an overview, to guide the user through the Procedure.
3. Steps and length
Procedures, by definition, are comprised of steps and the instructions on how to perform those steps. The number of Procedure steps will basically correlate with the Procedure length. The number, length, and complexity of the steps will determine how the Procedure will break down
A Procedure may contain many steps (25 +) and be linear. However, it still should be broken down into several modules, if possible. If a Procedure has less than 10 steps, it should qualify as a single Procedure. If a Procedure has numerous graphics, examples, or screen shots, the maximum number of pages can be expanded, as the graphics can use up a significant amount of space. Again, this is a judgment call on what is effective.
As a guideline, a Procedure module should contain only the steps needed to perform a single task. However, what is contained in that task will determine the Procedure break down.
4. Procedure breakdown
Understanding how to ‘break down’ a Procedure will assist you in building modular Procedures, where a Procedure is written only once. When you have large and/or complex Procedures, using modular Procedures greatly aids the usability for the user and the maintenance effort.
Stand-alone Procedure
A stand-alone Procedure in one that is not dependent upon other Procedures for instruction or context. A user would be able to reference the Procedure and perform a specific task without requiring other Procedures.
The following are qualities of stand-alone Procedures:
- Should be relatively simple and straightforward.
- Does not rely on other Procedures or a Master Procedure for content.
- May be referenced by multiple Master Procedures, because it is common to multiple Master Procedures.
For example, report definitions may be used by different users in different departments. Those users may use the report definitions for different purposes or for different Procedures.
- May be referenced for common global Procedures (for example, Logon instructions, Toolbar instructions, Transaction instructions).
- Should not be over 5 pages, consisting of 10+ steps. This may indicate the need of a Master Procedure or 2 + stand-alone Procedures. However, this is not a rule, but a guideline. If a Procedure is legitimately over 5 pages and/or consists of 10+ steps, it is acceptable.
Master Procedure
A Master Procedure requires Sub Procedures for complete instruction or context. While a user would be able to reference a Sub Procedure and perform a specific task without requiring other Procedures, a complete understanding of the Procedure would not be available without the Master Procedure.
The qualities of Master Procedures are the following:
- More complex and lengthy.
- May have multiple error processing or control points that add complexity.
- May take the form of a graphic or map for clarity purposes.
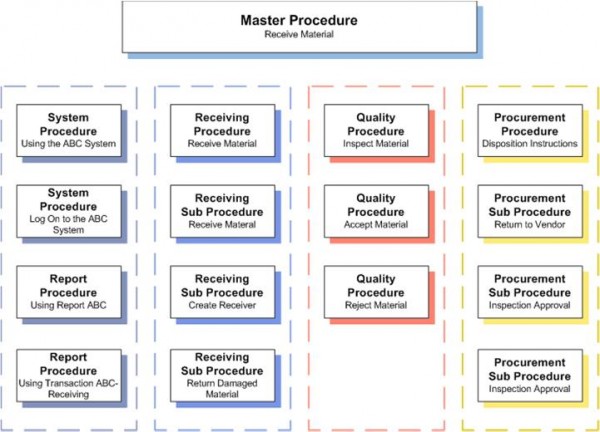
For example, complex Procedures, such as Receive Material, may require multiple transactions using multiple screens, multiple paths, and various outcomes. If you attempted to write one Procedure for Receive Material, the Procedure could be 100+ pages.
- References Sub Procedures.
- References Sub Procedures used by other Master Procedures.
The following example, Receive Material, demonstrates multiple Procedures within the Master Procedure.
Sub Procedure
A Sub Procedure receives its context within a Master Procedure. The Sub Procedure is similar to a stand-alone Procedure, except that it finds its context within the Master Procedure. The Sub Procedure expands or elaborates on one task within the Master Procedure or other logical grouping.
Work instructions
Work instructions are synonymous with Procedures. They address the Procedures used by an audience and provides complete instructions required to perform their tasks.
Checklists
A Checklist is a condensed Procedure. When a complex and/or lengthy set of Procedures have been completed, a Checklist can be developed that summarizes the steps. Knowledgeable users may not want to take the time to reference the complete Procedure and require only a reminder as to steps. The Checklist provides a quick reference for those users.
5. Level of detail
Performing the eDocumentation Process™ Audience Evaluation gives an understanding of the level of detail required by the audience.
Procedures must be at the proper level of detail – too much detail or too little detail will have the same result – the audience will not use the Procedure.
The following is a very simple example of an instruction on how to enter a page break. This is simply a level of detail example. Based on your audiences and the Procedure, you would determine the proper level of detail. If you were writing a Procedure to complete a regulatory form, you would use example 1. However, if you were writing a Procedure for MS Word Beginners, you would use example 2 or 3. Example 4 has too much detail and example 5 is a shortcut.
| Example 1. | Insert Page Break | Simplest instruction with no detail |
| Example 2. | Insert tab => Pages group => Page Break | Simplest instruction with detail |
| Example 3. | Using Insert tab, in the Pages group, click Page Break | Difficult to read, but complete detail |
| Example 4. |
|
Most detail. If this amount of detail is required, it should be part of an orientation or training document. |
| Example 5. | Press: CRTL + SHIFT + Enter | Difficult to understand |
6. Modular Procedures
Procedures are developed as modules (See eDocumentation Process™ Modular Writing).
Every Procedure is a module. The Procedure should part of the whole.
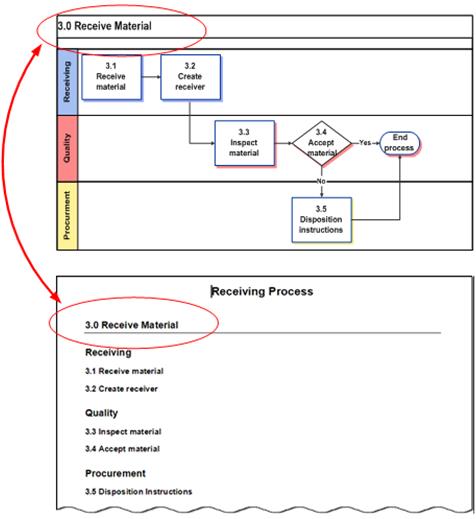
Using the Receive Material Process as an example, there would be five separate Procedures. Each Procedure would be a module. The overall Process could be a flow or written as in the following example. The flow would be easier for the user to visualize the context of each Procedure.
There would be a minimum of five Procedures for the Receive Material Process. However, depending upon the size of each Receiving task, there may be additional Sub Procedures. The graphical presentation of the Receive Material flow is much clearer than a written presentation of the same material.
Example:
The Disposition instructions could involve other departments and other Processes – such as Return to Vendor, Scrap, Credit – depending upon the contract with the vendor. Therefore, you would list the potential Procedures and determine the qualities of the Procedures.
Procedures are modular. They are to ‘mix and match’, based on the audience requirements. The same content (task) is not re-written. This requires planning, as there are many factors to take into account.
From the Process flow, the following are the Procedures that could be developed. Each Procedure is a separate document. The content is not repeated between Procedures.
7. Lists and numbering
The List is the main writing format used for Procedures. Because Procedures consist of step-by-step instructions, lists should be used – not ‘traditional’ paragraphs. Paragraphs make the Procedures exceptionally difficult to read and follow. The following are the types of Lists:
Bulleted lists
Bulleted lists describe Procedure steps, but do not stipulate a specific sequence. They are referred to as ‘unordered lists’.
Numbered lists
Numbered lists are used to describe Procedure steps and stipulate their specific sequence. They are referred to as ‘ordered lists’.
8. Graphics
Graphics are used extensively in Procedures in the form of screen shots, report layouts, flows, etc. Graphics are needed to add clarity to Procedures and examples.
Guidelines
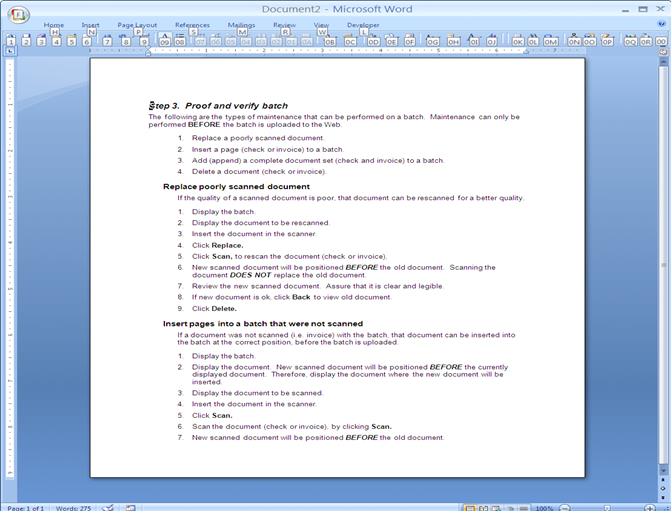
Use a screen capture tool, such as Snagit™ for screen captures. These tools have many options whereby you can draw attention to a specific feature such as icons, toolbars, fields, etc.
- Do not use the PrtScr key (Print screen), as it captures the complete window. This method may not capture the needed detail. Because you are writing Procedures, it is necessary for the user to see the detail of a screen, toolbar, report, etc. The Print screen option does not offer selected capture.
- Attempt to set standards for the graphics, such as border width, edge types, etc.
- Keep graphics simple. You are writing Procedures, not being a graphic artist.
PrtScrn example
In the following example the complete window is captured using PrtScrn. The specific capture cannot be selected and, therefore, details may become lost. The graphics are also larger and take more page space than needed.
Screen-capture example
Using a screen-capture tool, only the desired information can be captured. Therefore, emphasis and detail can be highlighted.
9. Master document
A Master document compiles the Procedures and/or Sub Procedures (modules) into a single document for a specific audience or purpose. Depending upon the software you are using, the capabilities and risks will vary. Therefore, you must thoroughly understand the potential pitfalls. The following are cautions to heed when using a Master document function.
- There should be no changes to the Master document, such as editing, etc. All changes must be performed to the modular (source) Procedures and/or Sub Procedures.
- All modular (source) Procedures or Sub Procedures must use the same template.
- List and heading numbering will almost certainly change, if the proper numbering is not used. Be sure to test the numbering scheme before using a Master document.
- Master documents can corrupt your Procedures and/or Sub Procedures. Be sure to backup all documents before creating a Master document.
The question becomes, ‘How are the Procedures and/or Sub Procedures (modules) combined into a ‘Master document without the risks?” You must understand the full capabilities and limitations of the software you will be using. Test the capabilities.


